 There is a place in my home town out in West Texas that sells the best BBQ stuffed baked potato. In fact, I am not sure that they really sell anything other than that. Sure they have the sides and all the other fixings of a great BBQ place, but no one actually buys that stuff. It is all about the BBQ baked potato. Here is my attempt at recreating it along with homemade BBQ sauce.
 First we will start with the meat. This step should occur in the morning as it will cook in the crock pot all day.
Ingredients:
1-2 lb beef roast
2 garlic cloves
1 T coarse ground pepper
1 can of coca-cola
 Begin my placing the beef roast in a crock pot. I promise this is a beef roast and not pork, I had my flash on. Don't worry, I corrected the issue for the next picture.
 To the beef add the cloves of garlic and pepper. There is really no need to chop the garlic - it will basically disintegrate during the cooking process.
 To the crock pot add one whole can of coca-cola. I know this might seem strange, but it actually serves as a great liquid cooking agent in the crock pot and leaves the meat with a slightly sweet flavor. It also pairs up nicely with the spicy BBQ sauce we are about to make.
 Coca cola is composed of several chemicals. One of the chemicals in coca cola is food grade phosphoric acid. It gives coke the sour and tangy flavor and also is responsible for coke's ability to clean rust and corroded metal. Another chemical in coca cola is dissolved carbon dioxide. Once the can is opened the pressure that was built up in the can is decreased and also decreases the solubility of the carbon dioxide - resulting in the fizzy carbonation. Yummy! Check out this Mythbuster video of the 101 uses of cola (they don't really show that many uses) that I use to show in my Chemistry class.
 Put the lid on the crock pot and allow to cook for 6-8 hours. My crock pot only has one setting so I am assuming that is medium heat but it might be high.
 Here is what the beef roast looks like after about 5 hours. It is looking good, but not really breaking up as much as it should be - it needs a couple more hours. Which means it is also time to start the other components of the meal.
 Place clean potatoes in a baking dish and pierce them a couple of times with a fork. Bake at 350 for 1 1/2 to 2 hours or until soft.
 Now for the BBQ sauce. This sauce is a work in progress. Each time I make the sauce I adjust something to try to get the actual flavor of a BBQ sauce that one would get at an authentic BBQ smoke house.
 Ingredients:
1 c. ketchup
1/2 c. water
2 T apple cider vinegar
3 T brown sugar
2 T honey
1 T Worcestershire sauce
1 T lemon juice (about 1/2 a lemon)
2 garlic cloves
1 t course ground black pepper
1 t onion powder
1 t ground mustard
1 t Franks' hot sauce
 Combine all ingredients in a small sauce pan.
 Bring liquid up to a boil and allow to boil for a couple of minutes.
 Reduce heat to low and allow to simmer for 1 1/2 hours.
 Ahhh, back to the beef. This is what the roast looks like after 7 hours. It looks pretty done to me. Plus I'm hungry.
 Remove the beef from the crock pot and place into a bowl. My friends El Smokeador y Smokehopper have some interesting and yummy looking ideas with what to do with the cooking liquid - go over and check it out along with all of their other recipes!
 After that quick advertisement, back to the BBQ potatoes! Shred the beef in the bowl. It should be pretty easy to do. Before shredding I finally removed that hunk of fat off of the roast.
 If you have timed it out right, the sauce on the stove should be pretty much done simmering. Add about half of the sauce into the bowl and mix to combine.
 Remove the potatoes from the oven and top with the beef mixture, cheddar cheese and BBQ sauce. Yummy! Any left over beef is also great in a sandwhich or tortilla.


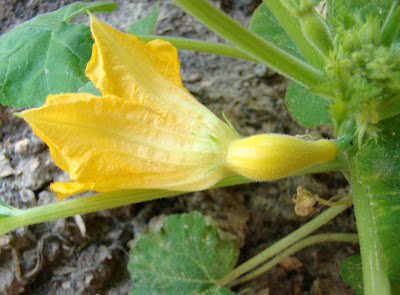 Why it is a squash, a crooked neck squash to be exact. Isn't it cute and fun sized?


 Here are some more strawberries on the other plant. These are
  Her name is Maggy. She is a six year old,
  Yeah, I am talking about you.


 Ingredients:
 First, cut the lemon. I know you can get lemons for like 5 for a dollar but, to get the most use out of your lemon, start by cutting it in half. Cut one half into slices. Cut the other half into wedges.
 Next, we are going to rim the glass with sugar. Begin by wetting the rim of the glass with the lemon wedge. Then invert the glass into a dish - ahem, salad plate - filled with sugar.
  And there you go! Sugar on the rim of your glass. Salt could also be a great substitute to rim the glass with, but I have a major sugar tooth so I am sticking with sugar!
  Now its time to get serious. Combine the crushed ice and tequila in the blender.
 Add the triple sec - this is a sweet margarita, remember?
 Also add one heaping 1/4c of frozen lemonade concentrate.
 Puree in the blender until nice and slushy. It will be a mixture somewhere between and frozen and on the rocks margarita.
 Pour the mixture into a glass and pour the shot of amaretto over the top. My glasses are on the smaller side so I had enough of the mixture to pour into two glasses. I didn't split the shot of amaretto.
  Garnish with a lemon slice and serve! This drink is really nice, sweet and refreshing. It works great to battle the heat and humidity, to serve along side a Mexican dish, or to share with your husband after a long week at work.