Saturday, August 1, 2009

Steak Burrito


Steak burritos are an easy weeknight meal that can be thrown together early in the day and forgotten about. Now that LT is crawling and pulling up on everything, including me if I stand in one place too long in the kitchen, this is a great meal to make!


Ingredients:
1 package flank or skirt steak
1/2 yellow onion, chopped
1 small can green chilies
1 package taco seasoning

Place steak on cutting board and rub both sides with taco seasoning.

Spray the inside of a crock pot with non stick cooking spray and then place the steak, chopped yellow onion, and green chilies in the crock pot.
I was nervous the first time that I tried this recipe. I was concerned because it didn't call for adding any liquid in the crock pot. But, have no fear, once the onion and chilies start to cook down there is plenty of cooking liquid.
Cover the crock pot and cook on low 8 hours - I started it mid morning for dinner around six.
Onions are is the genus allium which also contains shallots, garlic, leeks and chives. The distinctive flavor of a raw onion comes from sulfur containing chemicals that are a chemical defense against predators. Cooking the onion gives chemically changes the sulfur amino acids into either a savory or sweet flavor depending on the type of onion being cooked.

This is what the steak looks like after several hours of cooking. I like to shred the meat, but it can also be left whole.
Drain the meat before serving.

Serve steak in a tortilla with sour cream, tomatoes, and cheddar cheese. They are also delicious with an ice cold Modelo, or at least that is how Mr. T likes them!

Saturday, June 6, 2009

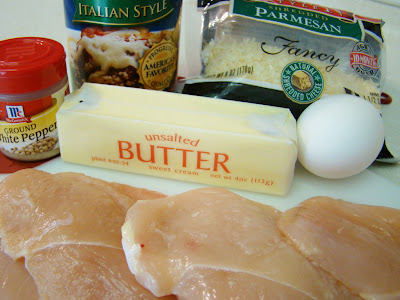
Crispy Baked Parmesan Chicken

This is a great recipe for a week night meal. What also makes this a great recipe is that you don't have to fry the chicken to get a crispy texture - it is only baked!

Ingredients:
1 c. grated Parmesan
3/4 c. Italian style bread crumbs
1/2 t. ground white pepper
1 egg + 1 T water
2 T butter or margarine, melted
1 pkg boneless skinless chicken breast, thin sliced
Place Parmesan, bread crumbs and pepper in a shallow dish larger than the chicken breast.

Combine.

Place the egg and water in a small bowl. Again, you want it to be large enough to dip the chicken breast in it. Whisk together with a fork.

Dip chicken pieces in egg.

Next, place the chicken in the shallow dish with the Parmesan mixture.

Make sure that the chicken is really covered with the Parmesan. This will make the crispy crust for the chicken.

Place the covered chicken in a jelly roll pan that has been sprayed with vegetable oil - aka Pam.

Once all of the pieces of chicken are placed in the pan take more of the Parmesan mixture and cover any holes. Leave no spot uncovered!

Bake the chicken at 400 degrees for 25 minutes.

After 25 minutes remove the pan from the oven and brush the chicken with the melted butter. Bake again for 20-30 more minutes or until the chicken is really crispy.

This is a wonderful recipe for chicken. You can serve it as is, or it makes a really great topping for a salad, or you can serve it my favorite way - topped with marinara and mozzarella.

Let me show you.

After brushing the chicken with the melted butter return it to the oven for only 10 minutes. Then top with store bought marinara and mozzarella cheese. Cook the chicken for the remaining amount of time to warm the marinara sauce and melt the cheese.

And there you have it! Easy Crispy Baked Parmesan Chicken smothered with marinara sauce and cheese! I served it with a salad and garlic bread. It made a great week night meal.

Tuesday, June 2, 2009

Cayenne Pepper

Here is a picture of my first cayenne pepper taken on May 9th. It was the first pepper to emerge from all of our different pepper plants. Look at how cute and small it is.
Look at it now! It is so big that it rests on the ground! I actually had to prop it up so that I could get a good picture of it.
Here is closer look. I just looked up that cayenne peppers are to be harvested when they turn red and are 3-4 cm long. It is about that long so I don't have much time to find a good recipe using one cayenne pepper! Does anyone know of a good recipe?

Saturday, May 30, 2009

BBQ Stuffed Baked Potatoes

There is a place in my home town out in West Texas that sells the best BBQ stuffed baked potato. In fact, I am not sure that they really sell anything other than that. Sure they have the sides and all the other fixings of a great BBQ place, but no one actually buys that stuff. It is all about the BBQ baked potato. Here is my attempt at recreating it along with homemade BBQ sauce.
First we will start with the meat. This step should occur in the morning as it will cook in the crock pot all day.
Ingredients:
1-2 lb beef roast
2 garlic cloves
1 T coarse ground pepper
1 can of coca-cola


Begin my placing the beef roast in a crock pot. I promise this is a beef roast and not pork, I had my flash on. Don't worry, I corrected the issue for the next picture.

To the beef add the cloves of garlic and pepper. There is really no need to chop the garlic - it will basically disintegrate during the cooking process.

To the crock pot add one whole can of coca-cola. I know this might seem strange, but it actually serves as a great liquid cooking agent in the crock pot and leaves the meat with a slightly sweet flavor. It also pairs up nicely with the spicy BBQ sauce we are about to make.
Coca cola is composed of several chemicals. One of the chemicals in coca cola is food grade phosphoric acid. It gives coke the sour and tangy flavor and also is responsible for coke's ability to clean rust and corroded metal. Another chemical in coca cola is dissolved carbon dioxide. Once the can is opened the pressure that was built up in the can is decreased and also decreases the solubility of the carbon dioxide - resulting in the fizzy carbonation. Yummy! Check out this Mythbuster video of the 101 uses of cola (they don't really show that many uses) that I use to show in my Chemistry class.
Put the lid on the crock pot and allow to cook for 6-8 hours. My crock pot only has one setting so I am assuming that is medium heat but it might be high.

Here is what the beef roast looks like after about 5 hours. It is looking good, but not really breaking up as much as it should be - it needs a couple more hours. Which means it is also time to start the other components of the meal.

Place clean potatoes in a baking dish and pierce them a couple of times with a fork. Bake at 350 for 1 1/2 to 2 hours or until soft.

Now for the BBQ sauce. This sauce is a work in progress. Each time I make the sauce I adjust something to try to get the actual flavor of a BBQ sauce that one would get at an authentic BBQ smoke house.

Ingredients:
1 c. ketchup
1/2 c. water
2 T apple cider vinegar
3 T brown sugar
2 T honey
1 T Worcestershire sauce
1 T lemon juice (about 1/2 a lemon)
2 garlic cloves
1 t course ground black pepper
1 t onion powder
1 t ground mustard
1 t Franks' hot sauce

Combine all ingredients in a small sauce pan.

Bring liquid up to a boil and allow to boil for a couple of minutes.

Reduce heat to low and allow to simmer for 1 1/2 hours.

Ahhh, back to the beef. This is what the roast looks like after 7 hours. It looks pretty done to me. Plus I'm hungry.
Remove the beef from the crock pot and place into a bowl. My friends El Smokeador y Smokehopper have some interesting and yummy looking ideas with what to do with the cooking liquid - go over and check it out along with all of their other recipes!
After that quick advertisement, back to the BBQ potatoes! Shred the beef in the bowl. It should be pretty easy to do. Before shredding I finally removed that hunk of fat off of the roast.
If you have timed it out right, the sauce on the stove should be pretty much done simmering. Add about half of the sauce into the bowl and mix to combine.

Remove the potatoes from the oven and top with the beef mixture, cheddar cheese and BBQ sauce. Yummy! Any left over beef is also great in a sandwhich or tortilla.

Monday, May 25, 2009

Spinach Stuffed Zucchini

I hope everyone had a great Memorial Weekend! I love when Mr. T has long weekends because it also means that the next work week will be short! It is really nice to have the extra time with him. We spent a lot of time out in the sun this weekend with his family. The beach wasn't that big of a hit with LT, but we did find out that he really likes being in the swimming pool water.
In honor of last week's post of baby squash, here is a recipe for spinach stuffed zucchini. The zucchini didn't come from our garden, but I am hoping to make something similar to this with my own sometime this summer.
Ingredients:
2 zucchini
1 box frozen spinach
1/4c. Asiago cheese
1/4c. Italian bread crumbs
4 oz. cream cheese
1/8 t red pepper flakes
1/2 t garlic powder

Begin by preheating the oven to 400 degrees. Cook the spinach according to directions on the box. For my spinach it was just a couple of minutes in the microwave. Prepare the zucchini by cutting off the ends and then slicing down the zucchini length wise.

Discard the ends and place the zucchini slices on the baking dish. Lightly drizzle each with olive oil. Season with salt and pepper.

Turn over and repeat. Place in the preheated oven to roast for 10-15 minutes.

Covering the vegetable in oil before cooking is an important step because it creates a better flavor. Scientifically, the oil coating the outside of the vegetable absorbs more of the heat from the oven than the vegetable does. Therefore, the surface of the vegetable gets hotter than it would without the oil and allows for browning and eventually a quicker cooking time.

Meanwhile, ring out all of the extra liquid in the spinach. Combine in a bowl with cream cheese, asiago cheese, and bread crumbs. Parmesan cheese would also be yummy in this dish. All I had was the grated stuff in the green can so I went for the asiago cheese instead. It was left over from a previous recipe. These are the decisions of an at home cook/stay at home mom - life changing I'm telling you.

At this point, the zucchini should be soft and done roasting in the oven.

Scoop out the inside of the zucchini. Be sure to dig out most of the insides so that you can get a lot of filling in there, but not so much that you cut into the skin of the vegetable.

Here is a closer glimpse. Look at how the zucchini browned on the edge - yum!
Place the inside of the zucchini into the bowl with the other filling ingredients. Mix to combine.

Also add in the spices - adjusting to your likings. If you want it to have a bit more kick add in a 1/4t of the red pepper flakes.

Place the filling back into the zucchini and sprinkle with with a little more asiago cheese.

Reduce the oven temperature to 325 degrees and bake for 15 minutes longer or until they are heated through. Serve.


This is a great summer side dish. It also reminds me of a twice baked potato which might be my all time favorite side dish. There are so many variations that you could make to this recipe just by switching out the type of cheese or possibly adding bacon. Hmmm... I think I will be adding bacon next time.

Have a great short week!